Simulating robots in cloud with EC2 and Isaac Sim
Recently, I have been working on a project that involves simulating robots in the cloud using Amazon Web Services (AWS) and Isaac Sim. The goal of the project is to create a platform for testing and training robotic systems in the cloud, without the need for expensive hardware.
In this post, I will show you how to set up the simulation environment (Isaac Sim) and ROS2 on AWS EC2 instances.
Introduction
Isaac Sim
The Nvidia Isaac Sim is a powerful tool for creating and testing robotic systems. It provides a wide range of features, including physics simulation, rendering, and AI integration.
Amazon EC2
EC2 is a cloud computing service provided by Amazon Web Services (AWS). It provides a wide range of compute, storage, and networking resources to build and run applications in the cloud. The g5 family of EC2 instances is designed for GPU-accelerated computing, which is suitable to run Isaac Sim. By using EC2 instance, we can avoid buying expensive hardware to run Isaac Sim. With Isaac Sim running on an EC2 instance, we can access the simulation environment from anywhere with a web browser (with a remote desktop connection) or via Isaac Sim streaming client. Here, I use DCV to connect to the EC2 instance. DCV is a high-performance remote display protocol. It delivers the remote desktop ad application streaming from EC instances to any device with a web browser.
Setup
Launching an Instance for Simualtion
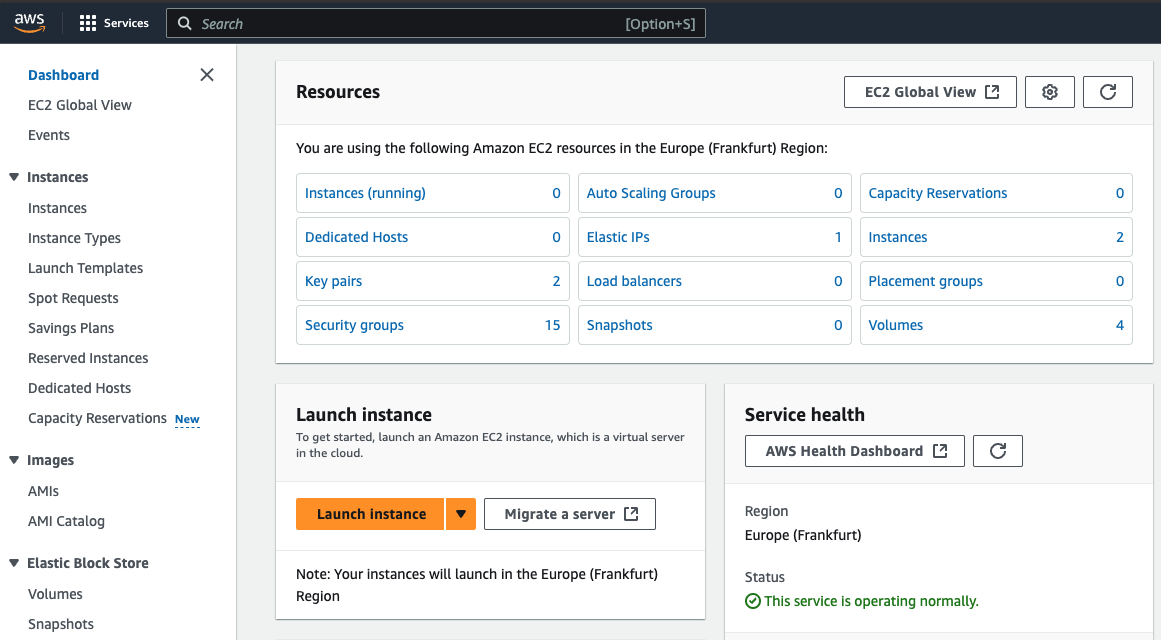
Login your AWS account and navigate to the EC2 page. Click Launch Instance.
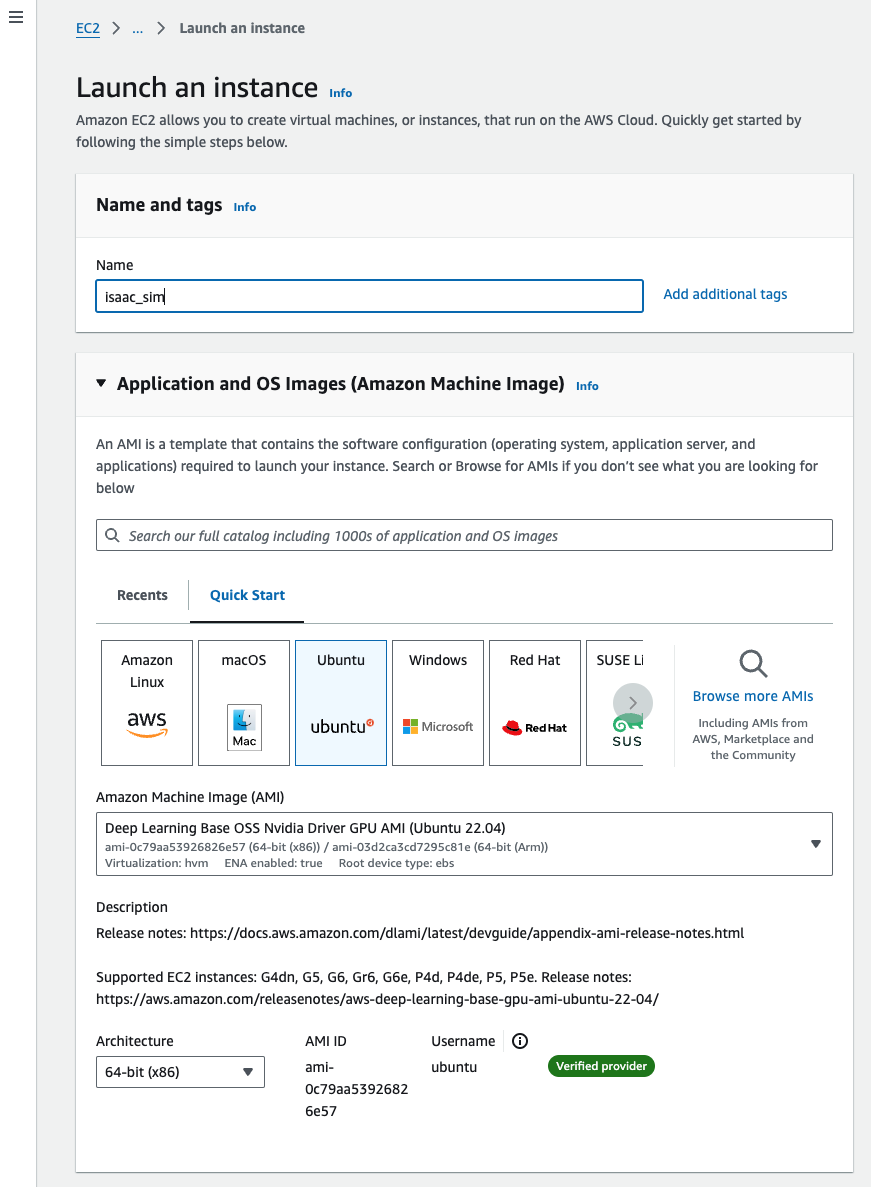
Give the instance a proper name, then go on to select the Ubuntu AMI. Click the dropdown and select the Deep Learning Base OSS Nvidia GPU AMI. This AMI is the Ubuntu instance with Nvidia GPU drivers installed.
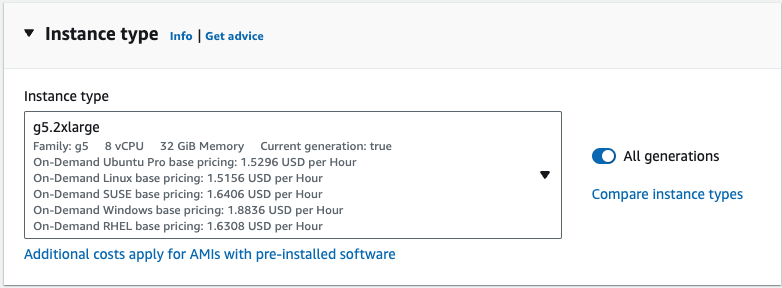
Under the instance type, select any instance in the g5 family. Here, I choose the g5.2xlarge which is the best option I can choose within my budget limit.
For key pair, select the key pair you created before. If you don’t have a key pair, click Create key pair and following the instructions on AWS.
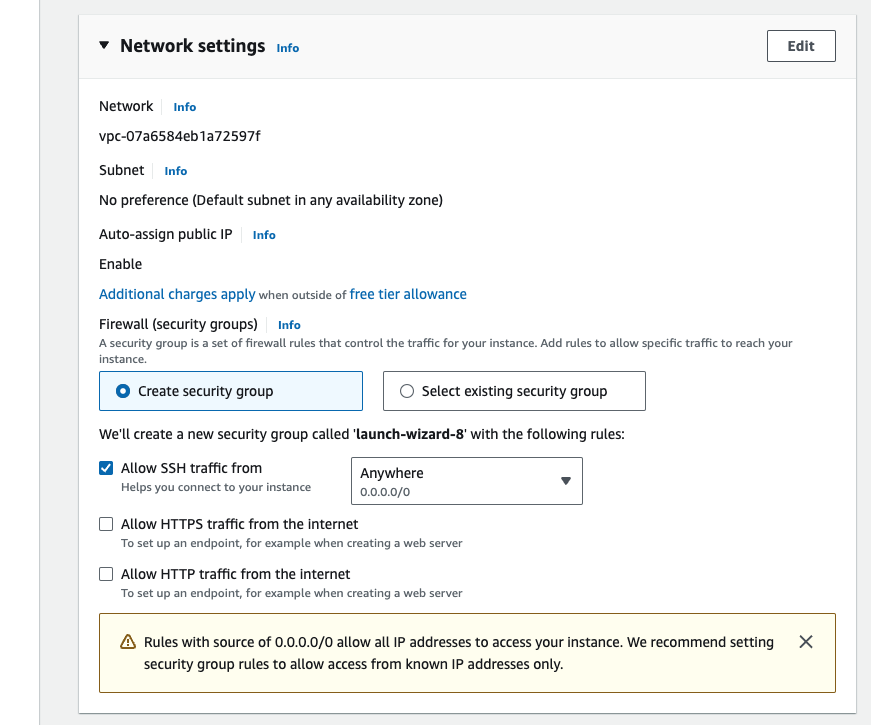
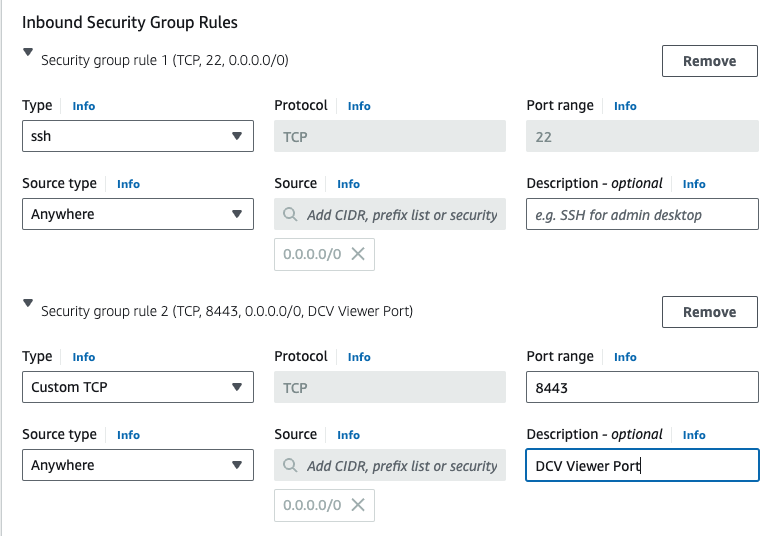
For the Network Settings, click Edit. We will need some ports for SSH and remote desktop connections.
For the ssh connection, I set the Source type as Anywhere as I don’t have a fix IP from my ISP.
For the Remote Desktop Connection, I set the port range as 8443 which is the port used by DCV for the remote desktop connection.
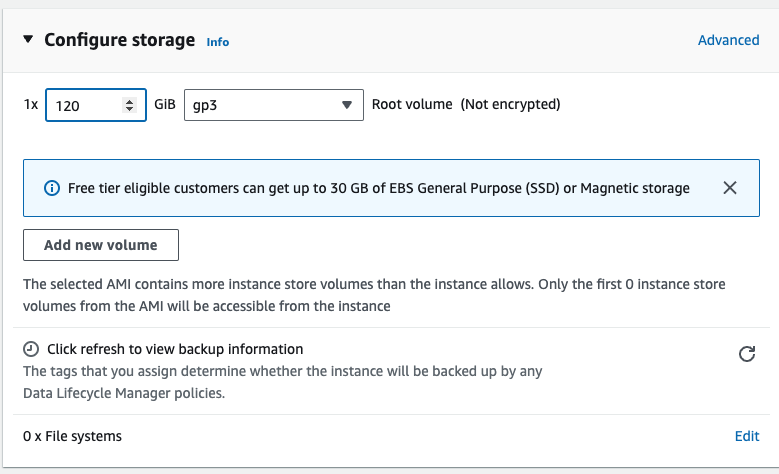
Finally, we need to configure the Storage. The default size is 65GB. But I need more than that, so I set the size to 120GB.
Now, we are ready to launch! Click Launch instance. Wait for it to launch and ssh into it.
For this AMI, the Nvidia drivers and docker will be installed automatically. Executing the following command to check if the Nvidia drivers are installed and working properly.
1
nvidia-smi
Information about the Nvidia drivers will be displayed.
Remote Desktop Viewer
EC2 provides free licensing for DCV which is a high performance remote desktop viewer. We will use this tool to connect to the EC2 instance.
- Install a desktop environment and desktop manager
1
2
3
4
5
6
7
sudo apt update && sudo apt upgrade -y
sudo apt install -y ubuntu-desktop gdm3 mesa-utils
sudo sed -i s/'#WaylandEnable=false'/'WaylandEnable=false'/g /etc/gdm3/custom.conf
sudo systemctl restart gdm3
sudo nvidia-xconfig --preserve-busid --enable-all-gpus
sudo systemctl isolate multi-user.target
sudo systemctl isolate graphical.target
These commands will install the default Ubuntu desktop environment and gdm3 desktop manager.
- Install DCV
1
2
3
4
5
6
7
8
9
wget https://d1uj6qtbmh3dt5.cloudfront.net/NICE-GPG-KEY
gpg --import NICE-GPG-KEY
wget https://d1uj6qtbmh3dt5.cloudfront.net/2023.1/Servers/nice-dcv-2023.1-17701-ubuntu2204-x86_64.tgz
tar -xvzf nice-dcv-2023.1-17701-ubuntu2204-x86_64.tgz && cd nice-dcv-2023.1-17701-ubuntu2204-x86_64
sudo apt install ./nice-dcv-server_2023.1.17701-1_amd64.ubuntu2204.deb
sudo apt install ./nice-dcv-web-viewer_2023.1.16388-1_amd64.ubuntu2204.deb
sudo usermod -aG video dcv
sudo apt install ./nice-xdcv_2023.1.565-1_amd64.ubuntu2204.deb
sudo apt install ./nice-dcv-simple-external-authenticator_2023.1.228-1_amd64.ubuntu2204.deb
- Configure DCV for auto-session start
1
2
3
4
5
6
7
8
9
sudo sed -i s/"#create-session = true"/"create-session = true"/g /etc/dcv/dcv.conf
sudo sed -i s/'#owner = ""'/'owner = "ubuntu"'/g /etc/dcv/dcv.conf
# Also enable clipboard for easier copy/paste
sudo bash -c "cat <<EOF >> /etc/dcv/dcv.conf

[clipboard]
primary-selection-paste=true
primary-selection-copy=true
EOF"
This will configure the server to automatically start a session for the ubuntu user.
- Start the DCV server
1
2
sudo systemctl enable dcvserver
sudo systemctl start dcvserver
The default ubuntu user has no password. To login to the remote desktop, a password is required. Set the password by the following command.
1
sudo passwd ubuntu
Once complete, you can connect the instance using the DCV client. Look up the IP address of the EC2 instance. Assuming the IP adress is 123.123.123.123. Use your browser to connect to https://123.123.123.123:8443. Enter ubuntu and the password you set. You should be able to login to the remote desktop.
Installing Isaac Sim
Installing Issac Sim is easy with this AMI. This instance comes with the Nvidia drivers installed. We can directly start installing Isaac Sim.
Follow the steps from the official documentation Issac Sim Workstation Installation.
1
2
3
wget https://install.launcher.omniverse.nvidia.com/installers/omniverse-launcher-linux.AppImage
sudo chmod a+x omniverse-launcher-linux.AppImage
sudo apt install libfuse2  # needed for running omniverse-launcher
Double click the omniverse-launcher-linux.AppImage file to install the launcher.
Install Cache from the Omniverse Launcher.
Install Nucleus from the Omniverse Launcher.
Install Visual Studio Code to view and debug source code.
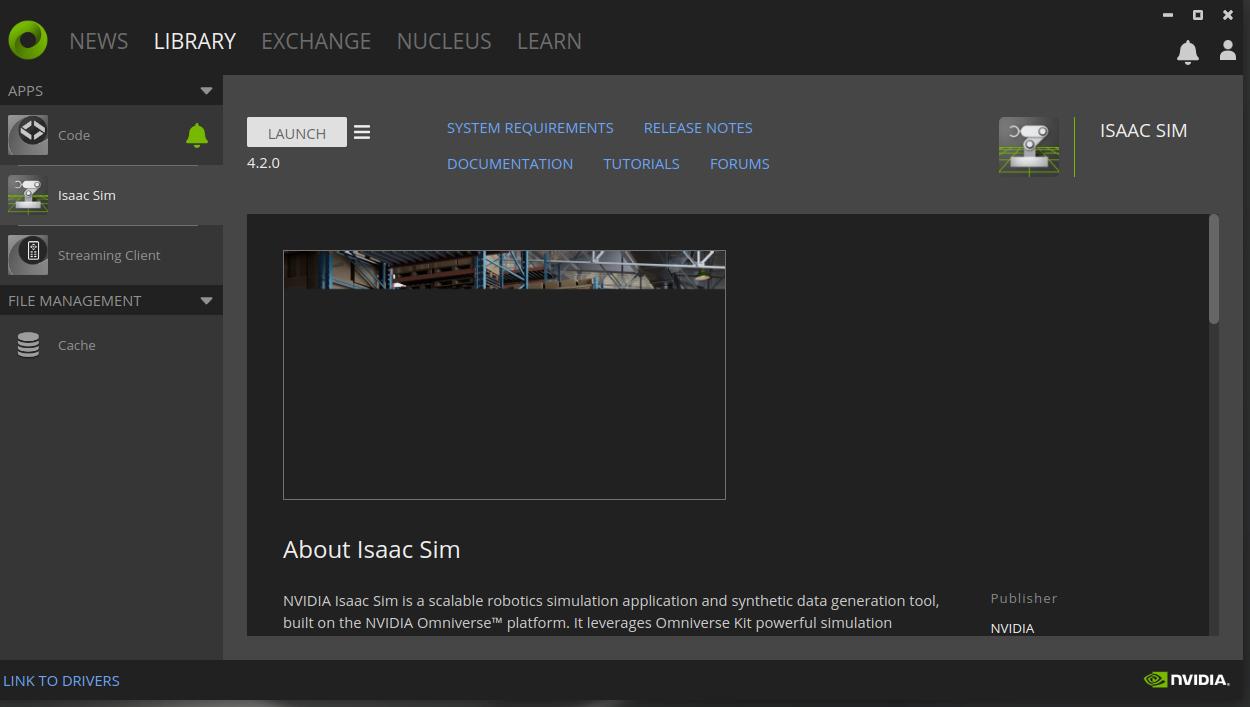
Install Isaac Sim from the Omniverse Launcher. Omniverse Isaac Sim can be found and installed on the Exchange tab in the Omniverse Launcher. To simplify the process, enter “isaac sim” in the search bar. When installation is complete, go to the Library tab and select Isaac Sim in the sidebar. To run the Isaac Sim App Selector, click the Launch button.
Installing ROS2
Now let’s continue with the ROS2 installation. ROS2 can be installed by following the official guide ROS2 Installation.
1
2
3
4
5
6
7
sudo apt install software-properties-common
sudo add-apt-repository universe
sudo apt update && sudo apt install curl -y
sudo curl -sSL https://raw.githubusercontent.com/ros/rosdistro/master/ros.key -o /usr/share/keyrings/ros-archive-keyring.gpg
echo "deb [arch=$(dpkg --print-architecture) signed-by=/usr/share/keyrings/ros-archive-keyring.gpg] http://packages.ros.org/ros2/ubuntu $(. /etc/os-release && echo $UBUNTU_CODENAME) main" | sudo tee /etc/apt/sources.list.d/ros2.list > /dev/null
sudo apt update && sudo apt upgrade -y
sudo apt install -y ros-humble-desktop ros-dev-tools
Source the ROS2 setup automatically.
1
2
3
echo "source /opt/ros/humble/setup.bash" >> ~/.bashrc
echo "export RMW_IMPLEMENTATION=rmw_cyclonedds_cpp" >> ~/.bashrc
source ~/.bashrc
Running the simulation on AWS EC2
- Start your instance if it’s not running.
- Find the public ip of your instance.
- Open the DCV viewer by using the public ip and port 8443 with your browser.
- Login with the ubuntu user and the password you set.
- Start the
omniverse-launcherand login with your Nvidia development account. - Go to
LIBRARYtab, selectIsaac Simand clickLaunch.
References
This posts is based on the following resources.

Comments powered by Disqus. Accept cookies to comment.